If you have any questions, do not use this product and contact us for clarification.
Cleaning your 9SX 9mm
Proper cleaning of the internals, booster piston assembly, and housing is imperative for the long life span of your 9SX. Cleaning the 9SX must be performed after every shooting session. DO NOT exceed 300 rounds before cleaning. It is recommended that you disassemble the silencer once you are done shooting, even if you don’t have the time for cleaning. This will keep the tube and core from seizing together during the expansion/contraction from the suppressor cooling off from use. Make sure that your firearm is unloaded and pointed in a safe direction. Use a heat resistant glove if needed. Please contact us if you have any questions.
Step 1: Remove the booster piston.
Grasp the tube body firmly and unscrew the booster cap from the tube by turning counterclockwise until the cap is free of the tube body.
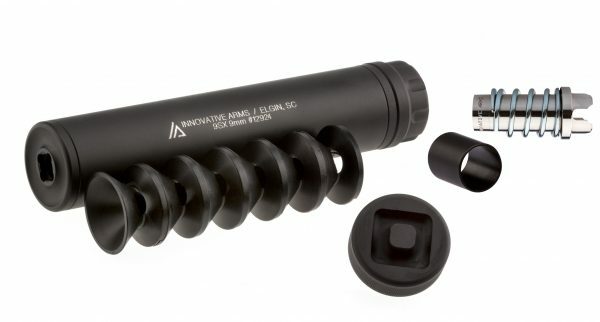
Step 2: Removing the internal baffles
Grasp the tube body firmly and unscrew the front end cap from the tube by placing the 9SX tool inside the bore and turning counterclockwise until the cap is free of the tube body.
Step 3. Cleaning
Booster piston and assembly
Wipe clean the piston, spring, and the inside of the housing (including threads) with a clean cloth and non-ammonia-based gun solvent. After ensuring the threads are clean, place a small amount of synthetic grease on the threads and spring (or fixed barrel spacer).
Internal baffles
Wipe clean the baffles with a clean cloth and a non-ammonia-based gun solvent. A bristled brush or pick may be needed to remove all debris.
Do not use any ammonia-based cleaning products. Ammonia may cause damage to the silencer.
Step 4: Reassembly
Reassemble the booster assembly onto the tube body.
Once cleaning is complete, place the spring over the piston and insert the piston in the housing, ensuring the piston teeth have engaged the alignment pin. Secure the booster cap to the tube body hand-tight only, using only a moderate amount of hand strength. DO NOT use excessive force and DO NOT use any tooling during this portion of re-assembly.
Reassemble the internal baffles into the tube.
Once cleaning is complete, place the baffles into the tube body with all baffles oriented as shown below with all the gas holes aligned. Proper installation of the baffles is imperative. Failure to properly install the baffles may cause damage to the silencer.
Secure the front-end cap to the tube and tighten firmly using the 9SX tool.
- Please go to the 9SX FAQ tab to see your Beyond The Warranty information about our maintenance services.